OnStepX, Hypertune & Pier Upgrade for the Celestron CGEM Telescope Mount
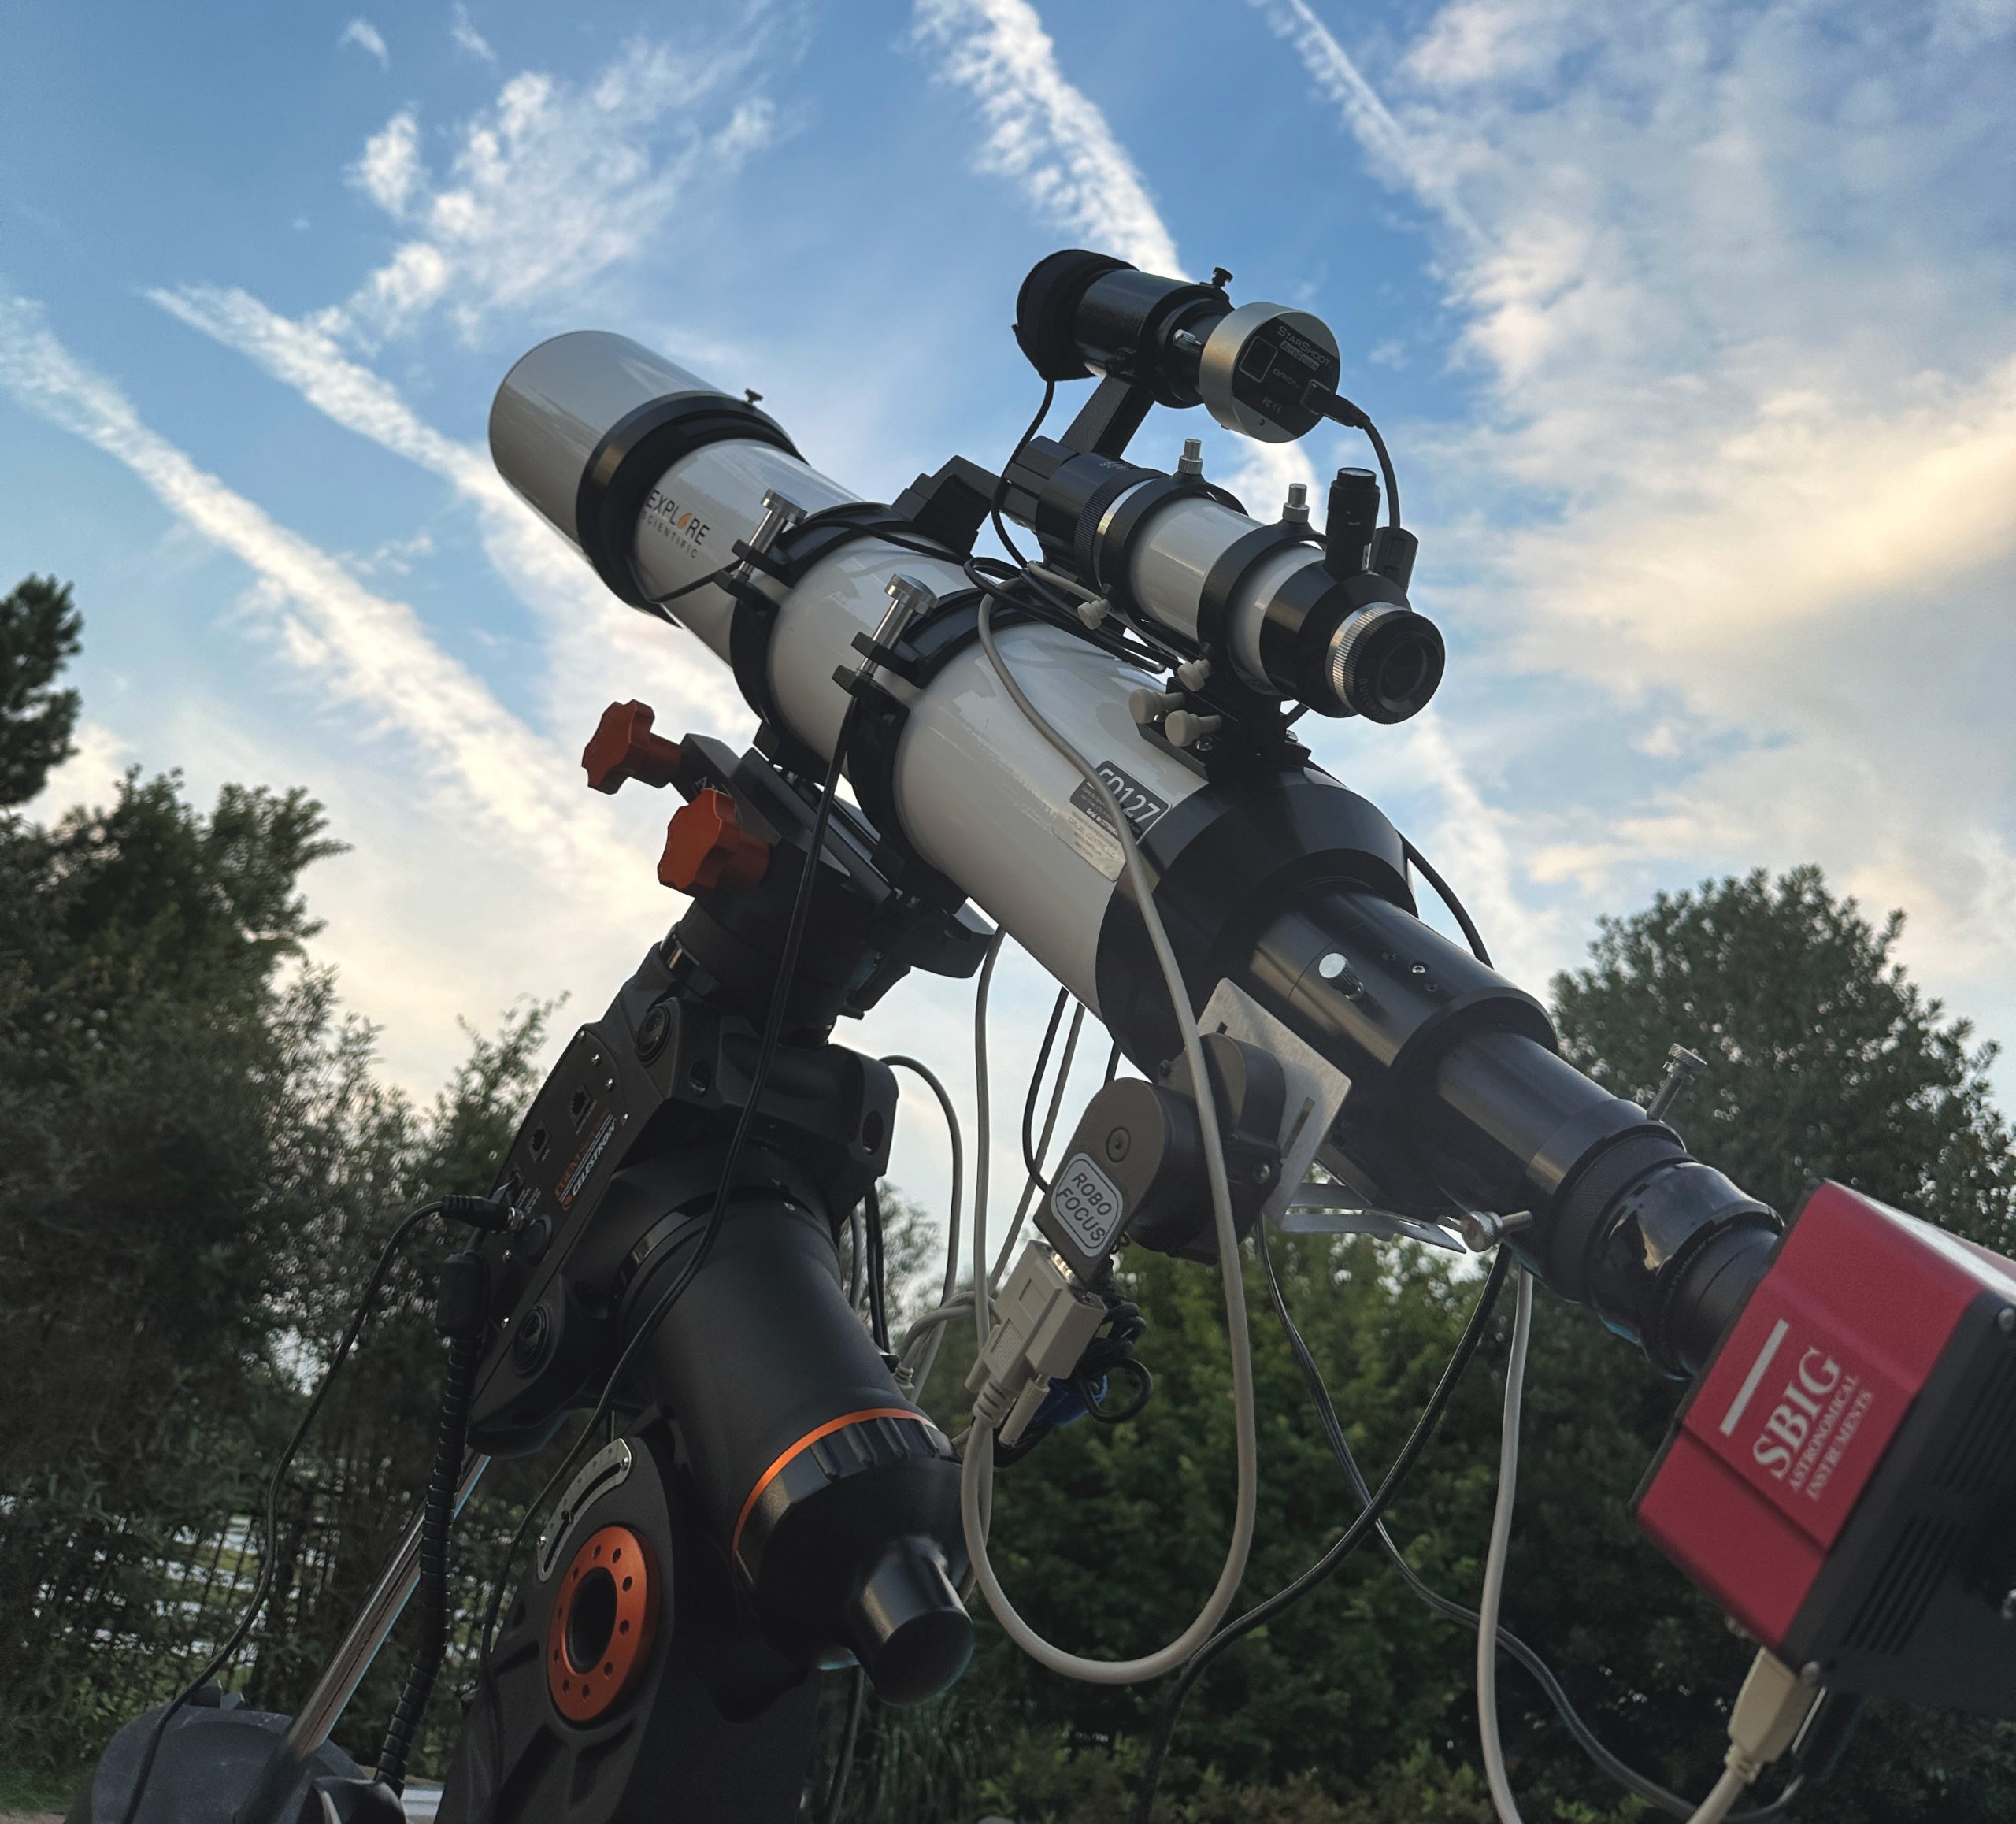
Several years ago, my Celestron CGEM telescope mount started acting up. It would randomly stop tracking in right ascension, so the objects I was observing or imaging would quickly slide out of view. I talked with Celestron about it and bought a new control board to solve the problem.
A few months ago, my CGEM starting having the same problem again. At over $300 for a replacement control board for a mount that frankly isn’t worth a ton any more, I started researching other options. On a fluke of YouTube, I ran across a video of someone who upgraded their CGEM to a belt drive. It was some mount expert-type guy and he didn’t give any details. Not helpful. However, much more expensive and newer mounts use belt drives to get outstanding tracking results with very little periodic error. Belts seemed interesting, so I hunted more.
I later stumbled upon OnStep. OnStep is an open-source project started by Howard Dutton that offers a way to replace existing telescope mount electronics with completely new and more advanced parts…including belt drives. If you have a non-goto telescope mount, you can also upgrade it. I quickly found posts from a handful of people who had upgraded their CGEM with OnStep. Several posted results with periodic error significantly improved over the stock CGEM motors and gears. One person talked about how he bought all the parts for barely over $100.
Significantly better tracking, more features, belt drives, a fun hardware & electronics project for cheaper than a new stock control board? I’m in!
I spent some time reading through everything I could find on OnStep upgrades for the CGEM. To do the upgrade, you have to take the mount apart quite a bit, so that led me down the hypertune rabbit hole too. People also report improved performance of their CGEM after hypertuning, sooooo….
Hypertuning the CGEM
Hypertune is Deep Space Product’s (DSP’s) registered trademark name for their series of kits, services & videos for improving stock telescope mounts. There are several other (free) guides online for tuning telescope mounts, including this EQ6 super-tune guide. I read through everything I could find and kept hearing that Deep Space Product’s Hypertune videos were great to have. You can also apply the cost of the videos toward the full Hypertune kit. So, I ordered the videos and watched them before deciding what I was going to do. I also ordered DSP’s worm gear retaining ring removal tool since that was cheap and designed specifically for what I needed.
As several others have mentioned, the CGEM Hypertune videos are fairly old. They’re great though. You don’t need 4k+ videos for this. (My 12 year old daughter even said the quality was fine.) Ed talks through and demonstrates everything you need to know to Hypertune your telescope mount. They’re well worth it for the price.
I decided against ordering the full DIY Hypertune kit though. I already had all the tools, sandpaper, and metal polish listed in the Hypertune kit, so I didn’t need to buy that stuff again. I also had plenty Super Lube, which lots of people have used to regrease their telescope mounts. I did buy the PTFE spacers from Deep Space Products (in addition to the worm gear retaining ring removal tool I previously ordered). I ordered four VXB ceramic bearings for the worm gear shafts straight from VXB.
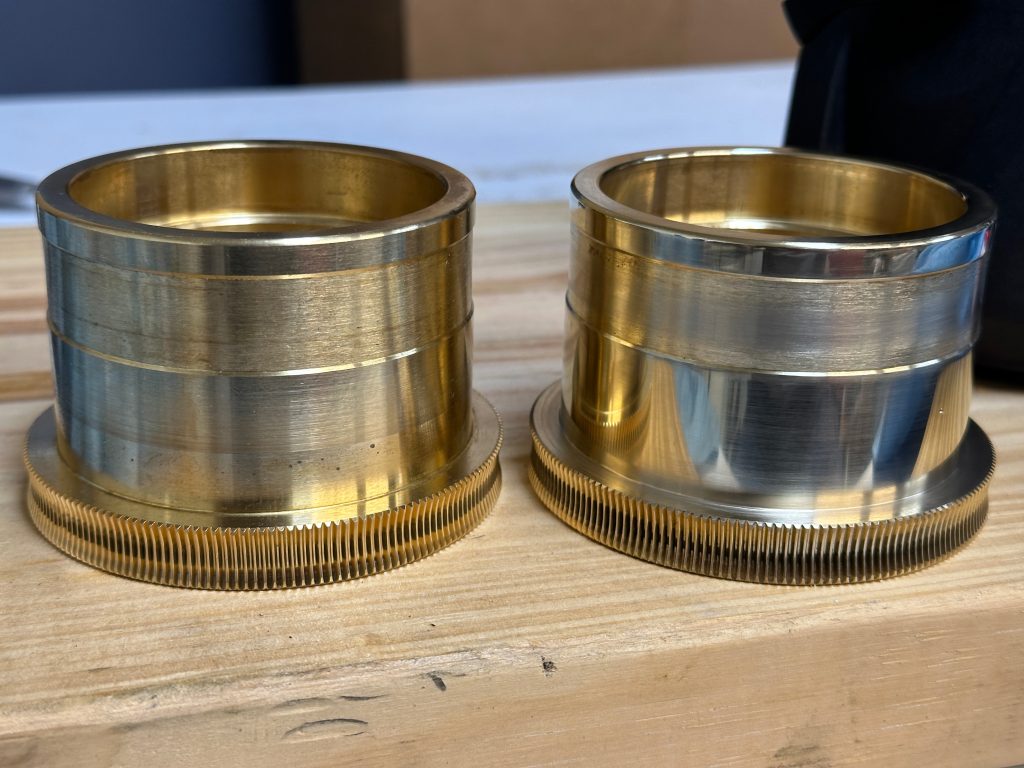
In the interest of supporting Ed from Deep Space Products, I’ll skip over most of the details of the Hypertune process. Big picture: everything fits better now and my mount has a few better bearings and a lot nicer grease. The motion feels really nice & smooth now. Buttery smooth. It’s “floaty” even.
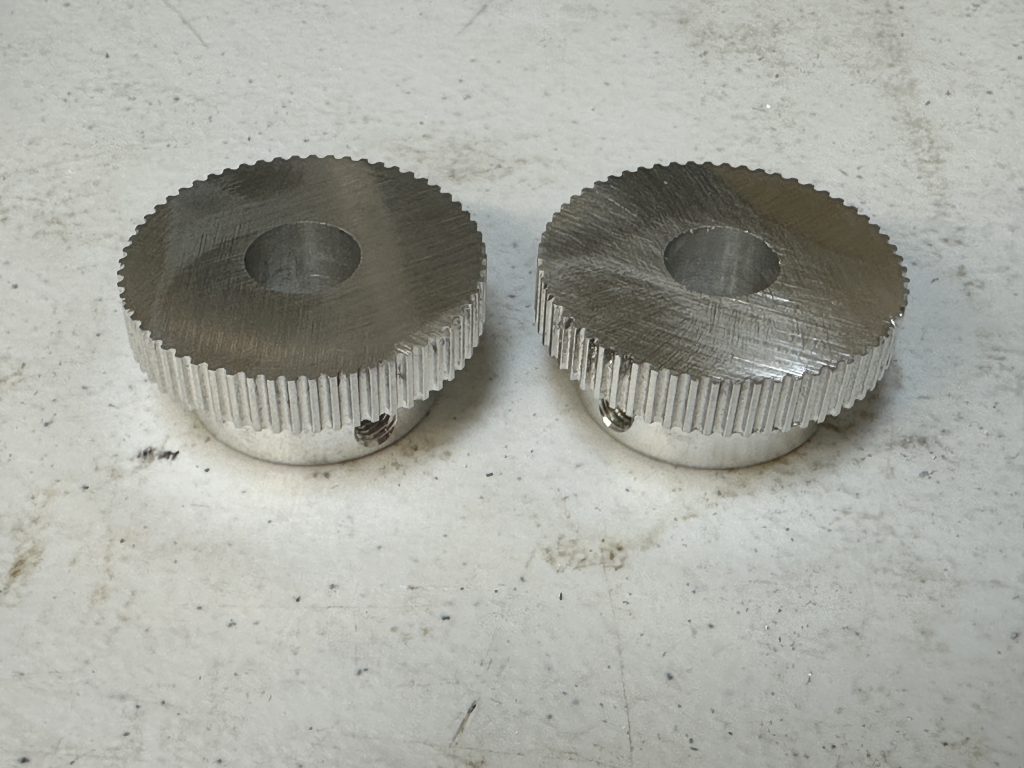
Here’s a before and after of the worm gears.
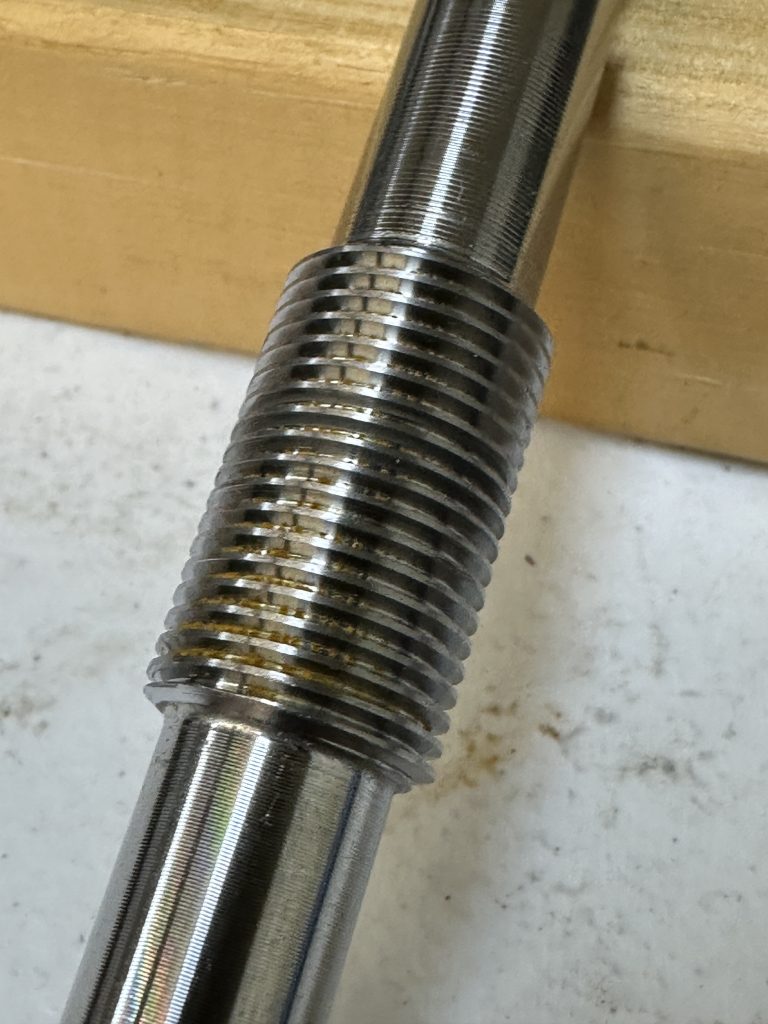
One gotcha I ran into with the Hypertune was with the worm shafts. After degreasing them, I rinsed them with water and set them aside to dry. I came back a few hours later and found little rust spots in the screw. I didn’t expect to see this so quickly since they’re stainless steel…oops. So, I used some CorrosionX and a toothbrush to get off as much rust as I could. I then rinsed them off (yep, again with water) and used an air compressor to blow them dry. They didn’t get perfectly rust-free, but hopefully it’s good enough. Here’s the “oops” picture from when I discovered the rust.
OnStep Upgrade
Toward the end of the Hypertune process, before you reassemble the mount, you need to start thinking about the OnStep upgrade. It would be a waste of time to reassemble your mount only to take it back apart to do the OnStep upgrade, right? I did a ton of reading at the OnStep Group, including learning as much as I could from others who have finished on OnStep upgrade to their Celestron CGEM mount. If you’re going to do a project like this, spend lots of time digging around the OnStep wiki. The answer to your question is probably there.
Here are some links that you’ll need to reference a lot if you do this upgrade:
- OnStep Wiki
- OnStep Configuration Wiki
- OnStep S6 Firmware Upload Wiki
- OnStep’s Smart Web Server Wiki
- Fysetc S6 Wiki
My initial goals with this OnStep upgrade were:
- Revive my CGEM mount and gain the improved features of OnStep
- Autoguiding tracking at least as good as when my CGEM worked properly
- GPS for automatic location and time syncing
- Direct Wi-Fi connection so I can use an old Android phone as a hand controller and for configuration
- Dew heaters controllable from NINA
Since OnStep is a continually evolving project, one thing I learned is when digging through group posts it’s really important to make sure you’re not acting on a post that has old (and now incorrect) info. For learning from others’ builds, digging through the Built With OnStep page has lots of links. I initially started down the road echoing Sean’s configuration, but modified some things along the way. Chris Vaughan & Francois Bouchard’s conversions were also interesting to learn from.
I tried to figure out the best configuration of pulleys & belts and asked some questions about that. Ultimately, I decided to go with the biggest gear ratio possible for both dec & RA (i.e. highest gear reduction between the stepper motor and the worm gear). All else being equal, that will give finer steps and should have smoother tracking. The tradeoff is that will limit my max slew speed a bit. I’d love to compare configurations with different pulley manufacturers and different gear ratios to quantify an optimum drive train, but I doubt I’ll ever do that research project.
I also learned that the original OnStep firmware isn’t what’s recommended for new builds. OnStepX is the new version of it, still from the same development team. That was easy to get confused about, since pretty much everyone on the OnStep group refers to both as just OnStep. I now do too. Use OnStepX though. Here’s the GitHub link.
Here’s the parts list I ended up with.
- Fysetc S6 V2.1 control board. This is an inexpensive control board designed for 3d printers, but it works well with OnStep and allows you to pile on tons of additional features without any of the tough work soldering a PCB on your own.
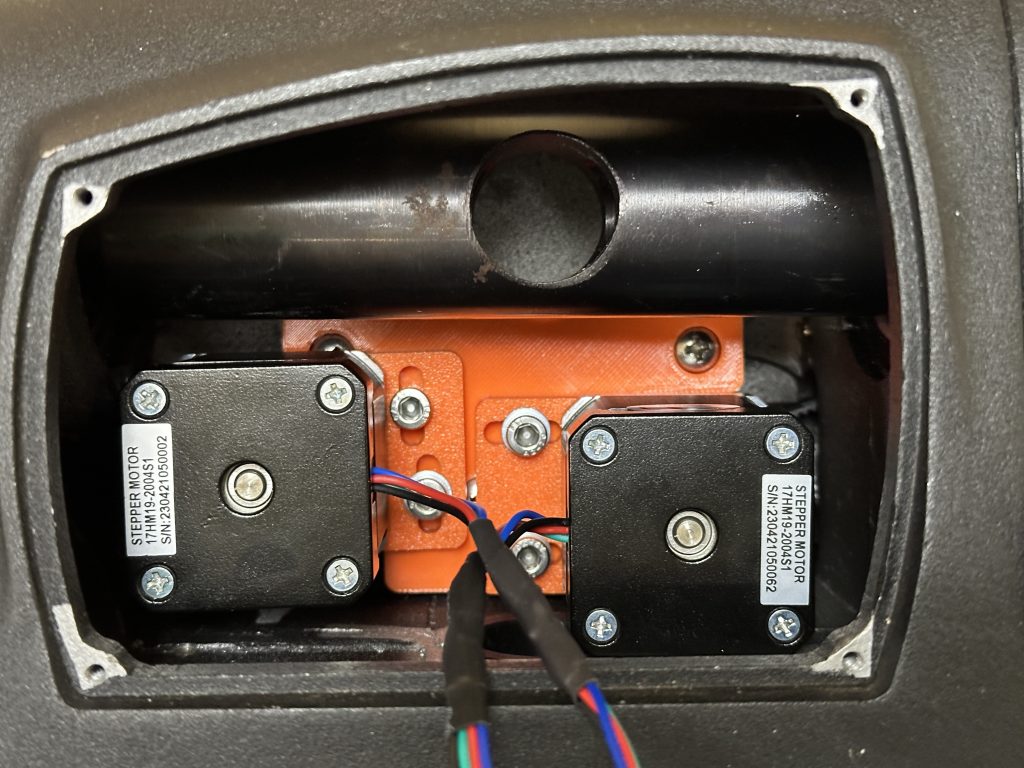
- Two Fysetc TMC5160 HV stepper drivers. I went with these because they’re very beefy and reportedly don’t need any additional moving air for cooling with typical telescope loads.
- Two OMC StepperOnline Nema 17 Bipolar 0.9deg 46Ncm(65.1oz.in) 2A stepper motors. For the CGEM with the typical OnStep 3d printed motor mounts, you can use either the D cut (17HM19-2004S) or full D cut (17HM19-2004S1) versions. You can sometimes buy them through Amazon too: here or here (affiliate links).
- GT2 pulleys and belts. 12T, 60T pulleys for a 5:1 gearing ratio (called GR1 in OnStep). Several people who did earlier OnStep CGEM conversions used MXL tooth profiles, but I think GT is the way to go for applications concerned about backlash & consistent motion.
- Two Powge 182mm GT2 belts. If you’re using a different mount or pulley config than me, you can use this belt length calculator to figure out what size you need. For the CGEM, the spacing between the pulleys is about 52mm. I found that rounding down in belt size works out well (if in doubt, go with a smaller belt instead of a bigger belt).
- Two 12T GT2 pulleys (5mm bore, 6mm belt width). These are generic, mass produced pulleys. I couldn’t find any higher quality 12T pulleys.
- Two Powge 60T GT2 pulleys (12mm bore, 6mm belt width).
- Note: Powge 48T GT2 pulleys are much easier to fit in the CGEM. With a die grinder and a Dremel, it was fairly quick work to make room for the 60T pulley. If you want an easier time, 48T pulleys reportedly also work very well.
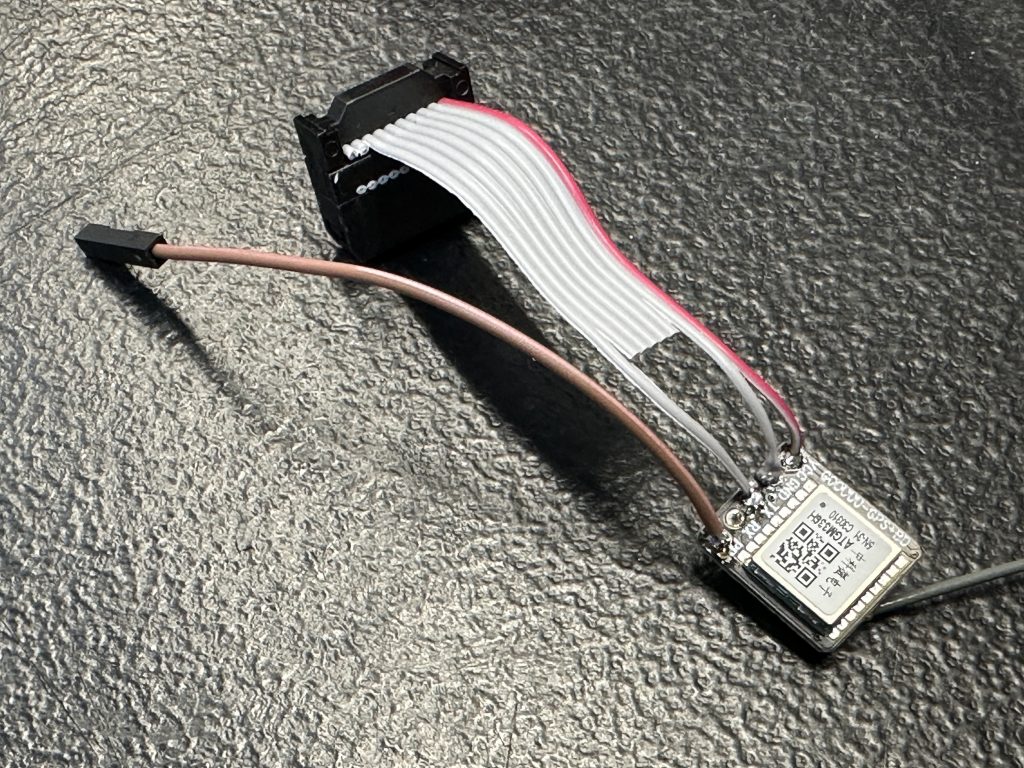
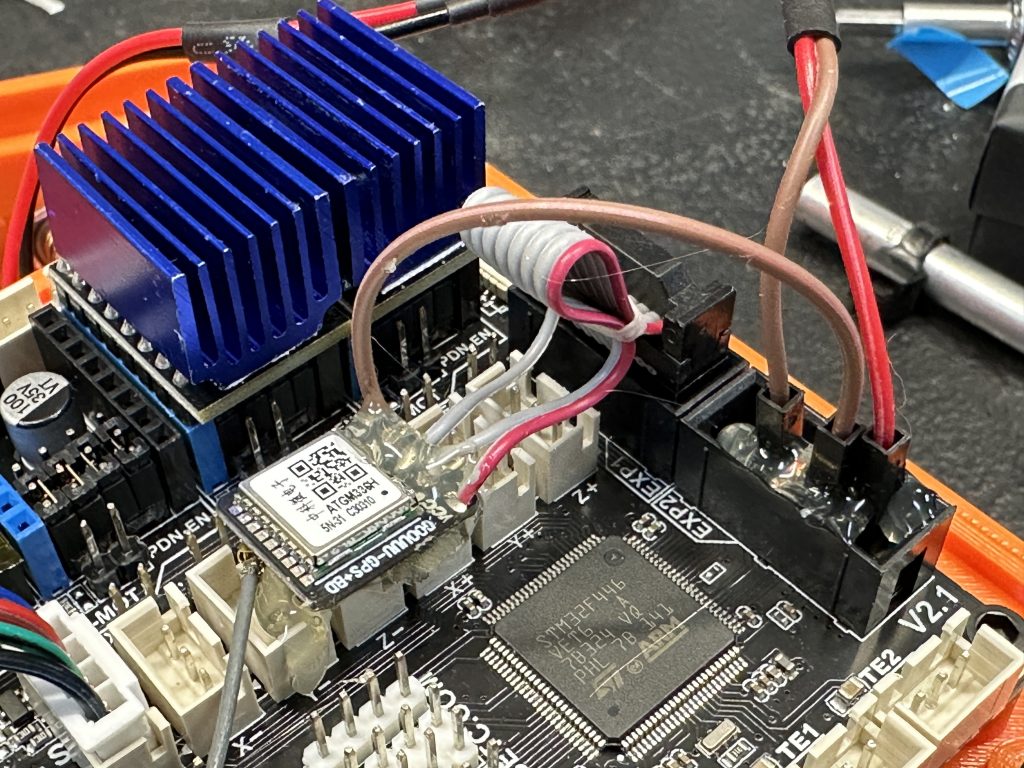
- ATGM336H GPS (affiliate link). This wasn’t necessarily the highest performance GPS available, but other OnStep users have great luck with it. It’s also fairly cheap and easy to get. Its external antenna’s short wire let me mount the antenna in a place to help with its view of the sky.
- Lolin Wemos D1 Mini v4 wifi module to run OnStep’s SWS web server. This is really nice to have for configuration & troubleshooting and it only costs a few bucks. I’m also planning to experiment with another D1 mini for a MEMS gyro/accelerometer-based home, park & limit sensor.
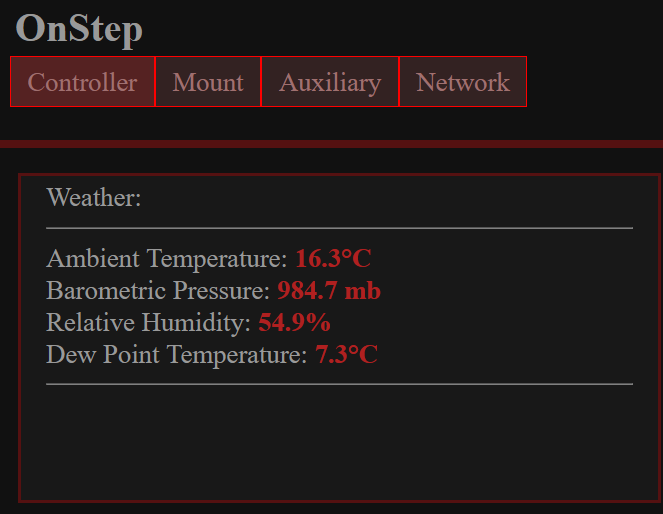
- GY-BME280-3.3V SPI weather sensor (affiliate link). This lets me monitor the temp & dewpoint at the telescope and also enables OnStep to automatically control the dew heaters.
- 3d printed motor mounts. I started with the ones from Brian Davis’ 2021 build, but later remade them from scratch in Fusion 360 and parameterized all the hole spacing & sizes. That lets me have slightly better motor mount alignment and use 5mm threaded brass inserts instead of plain nuts. You can get all my 3d printed stl files and their Fusion 360 versions here.
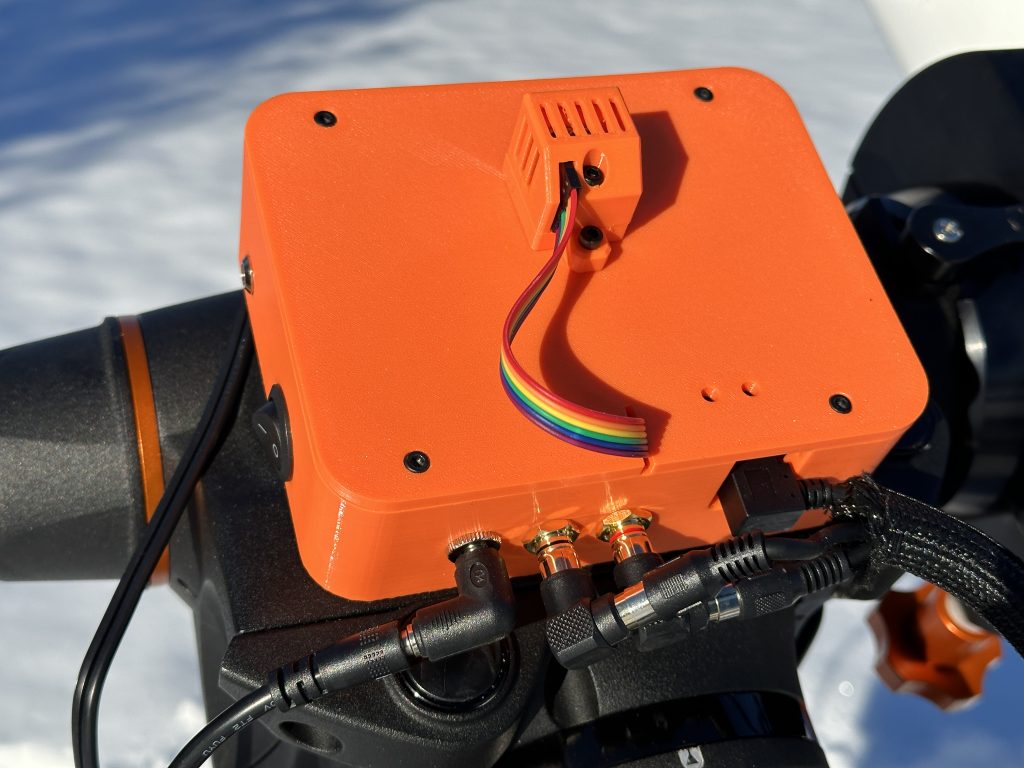
- 3d printed electronics case. I initially wanted everything contained within the CGEM, but decided to go with Corey Smart’s 3d printed case. It sticks out a bit from the side of the CGEM, but gives tons of room to mount everything and makes installation and working on the Fysetc S6 easy. I modified Corey’s files a bit to work with the switches, dew heater RCA jacks, BME280 weather sensor wiring. My modified case is also included here.
- 3d printed BME280 case. I modified this BMP280/BME280 enclosure from Printables to fit the 3.3V SPI version of the commonly available GY-BME280 board. Here is my version to fit the 3.3V version of the GY-BME280 board. I use the hole in the mounting tab to attach it to the lid of my electronics cover with an M3 screw.
- PETG filament. I used Hatchbox PETG, but you could also use another high temp filament like ABS or ASA if your printer supports those. Don’t use PLA though – if your motors get too warm, the PLA mounts will melt before PETG, ABS or ASA ones will.
- Power supply. I use a Pegasus 12V/10A power supply because I already had one for my dew heaters. Something like this 12V/10A power supply (affiliate link) looks like it would work well too for quite a bit less money. Depending on your configuration, it may be worth considering a higher voltage power supply, like this 24V/8A one (affiliate link). Several people on the OnStep group have reported success using laptop power supplies too.
- Miscellaneous connectors, switches, LEDs, etc (affiliate links):
- RCA jacks for dew heater connections.
- 90 degree RCA adapters to keep the dew heater wires from getting snagged when the mount rotates.
- 90 degree 5.5×2.1mm barrel plug adapters to keep the power from getting snagged.
- XH2.54mm connectors & wires to connect the stepper motors.
- Dupont breadboard jumper wires
- Indicator LED – A separate resistor isn’t required with these specific LEDs.
- Rocker switches – I used one of these as my main power switch.
Chris Vaughan put together a great guide and shared it in his Google Drive folder referenced here & direct link here. His guide’s filename is CGEM_ONSTEP_upgrade.pdf. I did a few things slightly different, mostly because I used different pulleys. I recommend printing that out and referencing it during your assembly.
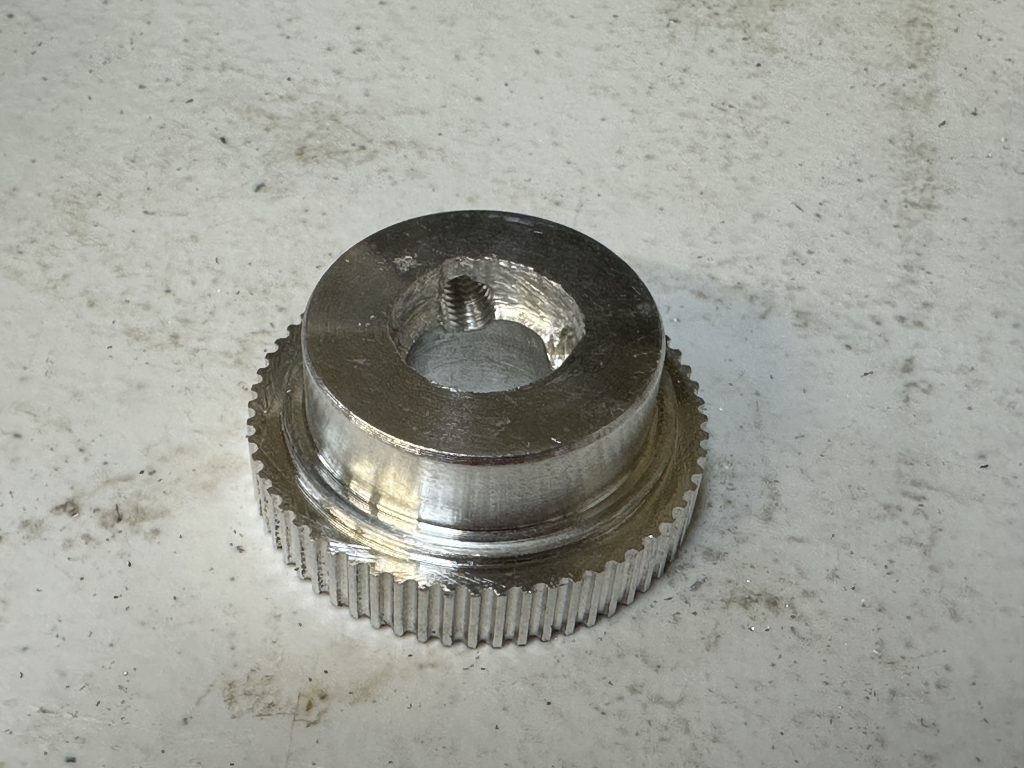
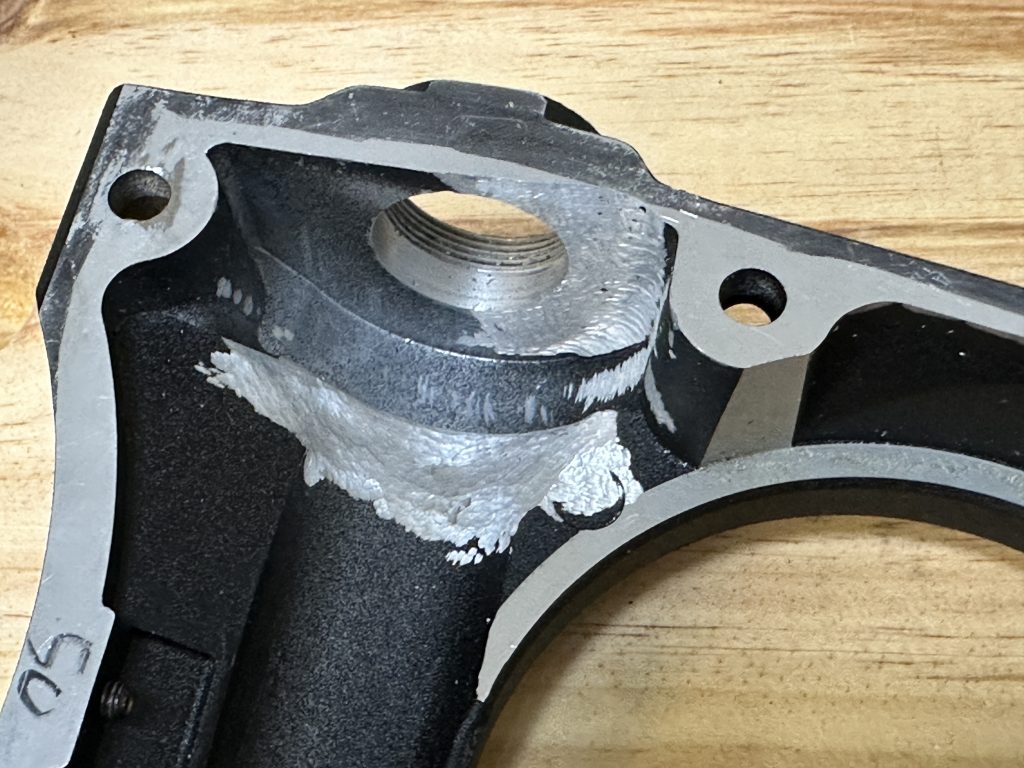
My 60T pulleys came with flanges on them. The pulleys are already pretty big and the flanges weren’t going to fit. Thankfully the flanges pop off pretty easily. I designed a quick 3d printed tool to hold them in place so I could tap the pulleys with a plastic-head hammer to remove the flanges. I’ve seen other people just pry them off with a bottle opener. After removing the flanges, I used a belt sander to grind down the part of the pulleys that supported the rear flange. This reduced the width of the pulleys and let them fit in the CGEM housing. I also used a Dremel to grind down a little bit of the pulleys at the front of the set screw section to help them fit more easily.
Like I mentioned before, fitting 60T pulleys required some grinding of the CGEM case. I also had to grind a bit on the worm shafts to extend the flat spots on them for the set screws to align properly. I just did some quick grinding with a Dremel for that – nothing pretty, but it works. After lots of test fits & iterating on the grinding, everything fit well together and spun freely. Here are a few photos during that process.
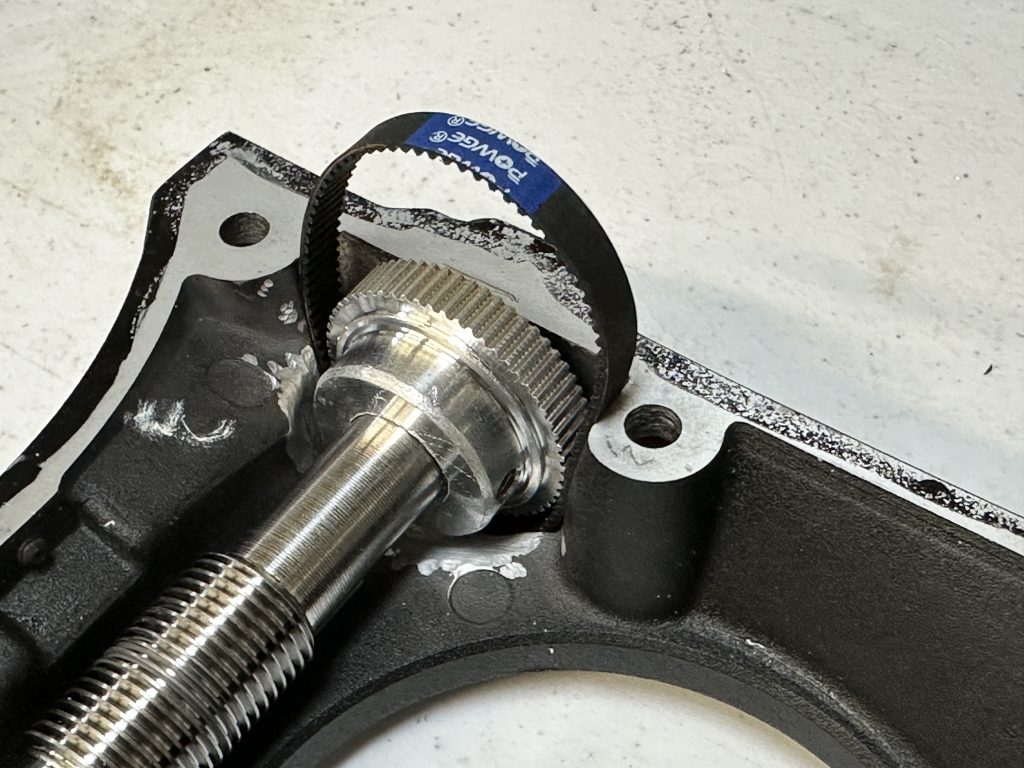
With the new pulleys in place, I reassembled the mount and installed the new stepper motors with their 12T pulleys and belts. It took a litle bit of work with a flashlight and small mirror to get the 12T pulley set right to make the belt align properly between the 12T and 60T pulleys. Others have used a small borescope to do the alignment.
OnStep Configuration
Follow the OnStepX wiki Configuration page and its sub-pages. Use your specific hardware to decide what each configuration item needs to be. My configuration file for OnStepX is here. My SWS configuration file is here. Be careful though – those may not be what you need. You can potentially damage equipment if you just blindly copy someone else’s configuration.
Here are some highlights from my setup:
- PINMAP needs to be set to FYSETC_S6_2 for the V2.x version of the S6.
- Motor drivers, directions & gearing details. AXIS1_DRIVER_MODEL and AXIS2_DRIVER_MODEL need to bet set to TMC5160. Steps, microsteps, max amps and direction need to be set depending on your configuration and will take some testing to iron out. These settings are working for me.
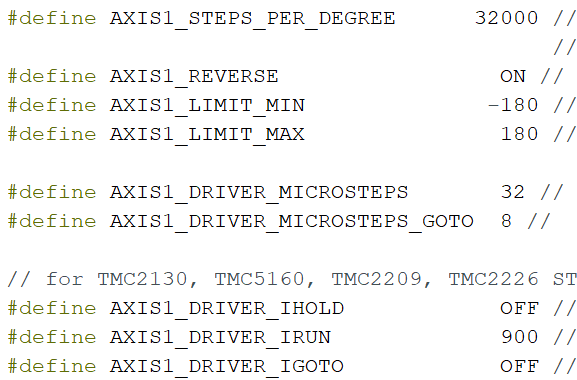
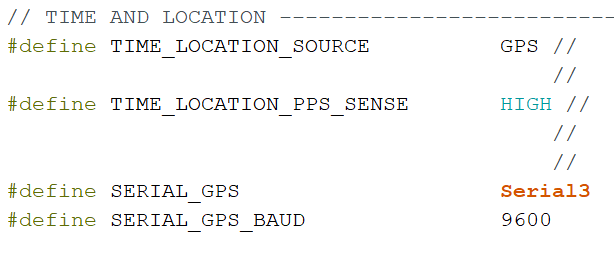
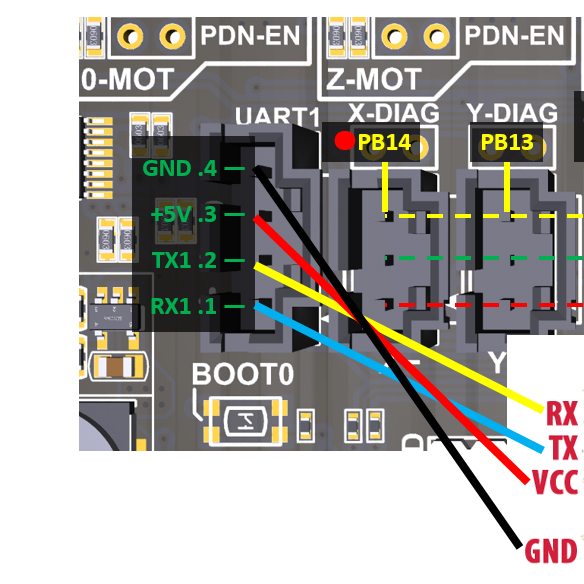
- GPS & PPS. You’ll need the settings in the screenshot below to get your GPS working and its PPS output setup to keep your time synced. Your GPS pins will connect to the USART-3 pins on EXP1. TX on your GPS will go to RX on the S6. RX on your GPS will go to TX on the S6 (although, OnStepX currently doesn’t do anything with the GPS’s RX pin). The GPS I used works on 5V, so I pulled 5V and GND from the bottom 2 pins on EXP1. I modified a ribbon cable and soldered it directly to my GPS. The PPS output on the GPS goes to PB10 on EXP2. You can see the EXP1 & EXP2 pins below or in the Fysetc S6 wiki. I attached the GPS to the S6 with some hot glue.
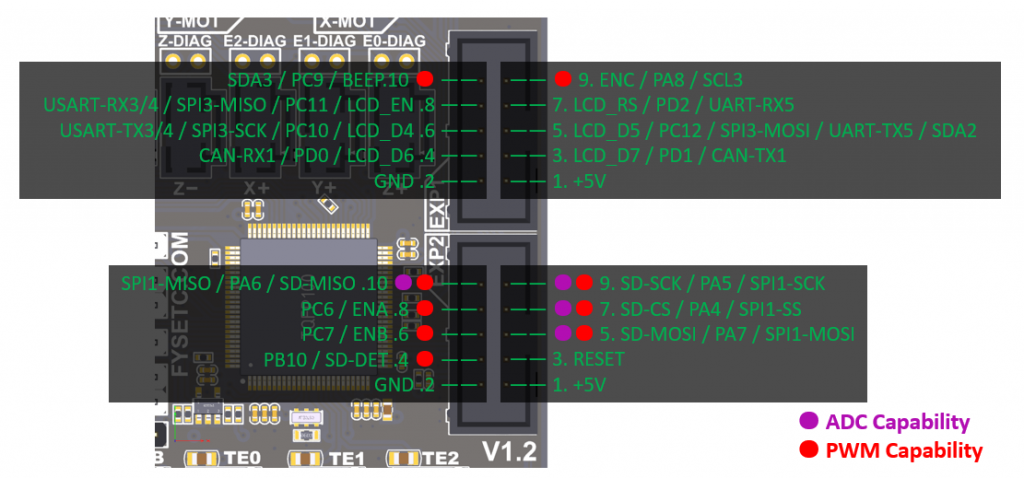
- BME280. In OnStepX’s Config.h, WEATHER needs to be set to BME280_SPI. For wiring the 3.3V BME280 module I connected the BME280’s 3.3V and GND pins to the X- connector on the Fysetc S6. Before I did this, I used a multimeter to double check that the output of the bottom pin was 3.3V and the middle pin was ground. (Check this yourself too to avoid frying your BME280.) The other pins get connected to the S6’s EXP2 connector. Again, you can use the Fysetc S6 wiki for the EXP2 diagram or look above this section. NOTE: there is more BME280 setup below in the Smart Web Server section.
- Pin 1 on the GY-BME280-3.3V, VCC, goes to a 3.3V pin on the S6. I used the bottom pin on the X- connector. To make this clean, I used a 3-pin XH2.54 connector to wire this up.
- Pin 2, GND, goes to a corresponding ground pin on the S6. I used the middle pin on the X- connector.
- Pin 3, SCL, is also SCK. So, it goes to PA5 on the S6’s EXP2, the SPI1 SCK pin.
- Pin 4, SDA, is also MOSI. It goes to PA7 on the S6, the SPI1 MOSI pin.
- Pin 5, CSB from the BME280 (aka CS & SS) goes to the PC7 pin on the S6’s EXP2. It DOES NOT go to the CS/SS pin PA4. (This cost me an hour of my life I’ll never get back.)
- Pin 6, SDO, is also MISO. It goes to PA6 on the S6.
- Dew Heaters. I already had a DewZap dew controller for my telescope, but in the interest of cleaning up wiring and being able to control everything remotely, I wanted to use OnStep and the Fysetc S6 to provide the power to my dew controllers. There are several posts in the OnStep group describing it working in a “dumb” mode with either ANALOG or DEW_HEATER settings. I was able to get those to work inside, but they just didn’t give enough output power to fight off dew in the real world. So, I added the BME280 described above to unlock OnStep’s automatic control of the dew heaters based on measured temperature and dewpoint. I used the settings below in OnStepX’s Config.h for my 2 dew heaters. There are also settings described in the SWS section you’ll need to do. For wiring the dew heaters, I used the E0 OUT and E1 OUT screw terminals on the S6.
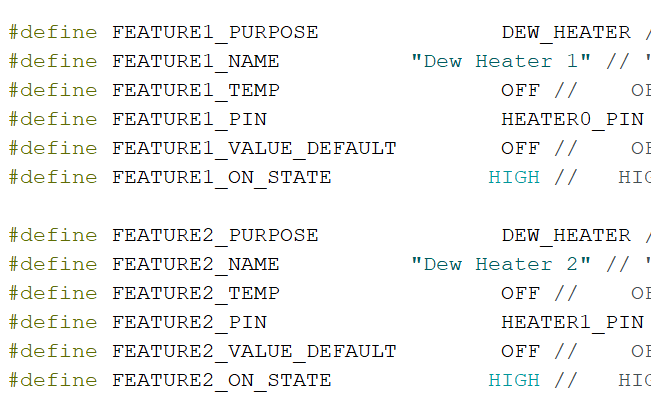
- I made a few other changes to the configuration. Those are under the guiding behavior, slewing behavior, pier side behavior (to work with NINA’s automated meridian flipping), and features sections. Dig through my OnStepX Config.h for more details.
Smart Web Server Add On
OnStep’s Smart Web Server gives you access to your mount over Wi-Fi. I plan to use this for controlling the telescope with an Android phone through the OnStep app. It’s also great for mount configuration and troubleshooting.
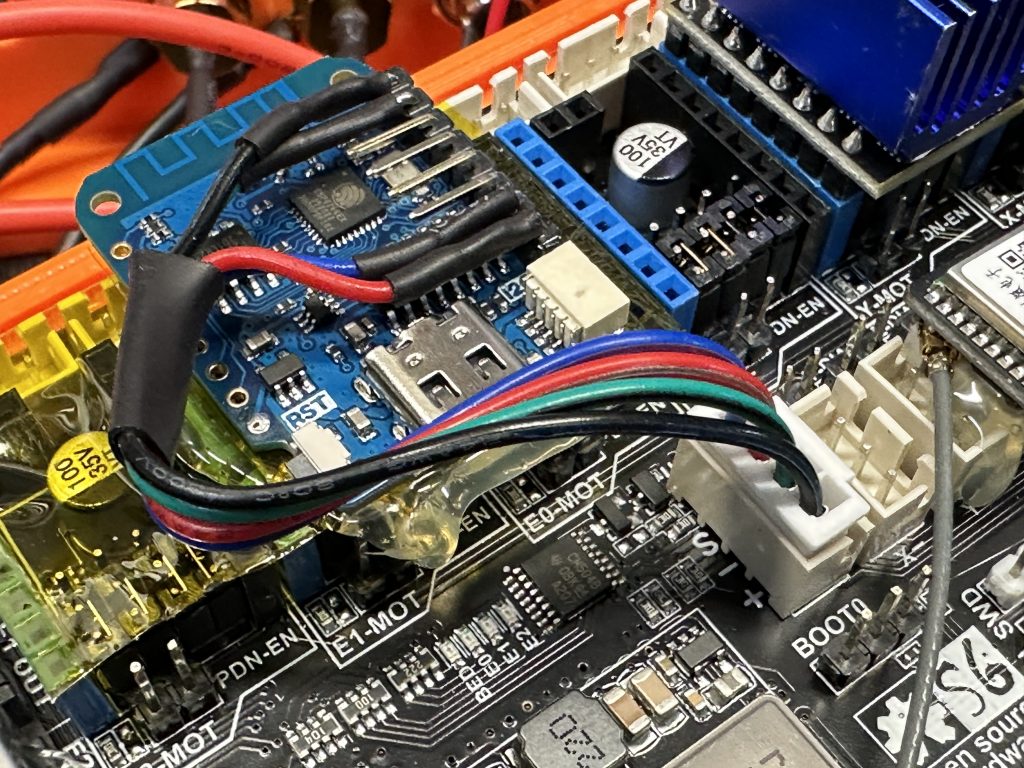
I connected the D1 to the S6’s UART1 XH2.54mm plug. You can see the D1 mini’s pinout here and the S6’s UART1 pinout here. I also put a modified version of the S6 pinout graphic below. TX goes to RX, RX goes to TX, VBUS gets wired to 5V, and GND goes to GND. I used an XH2.54mm 4-pin connector to make the connection tidy. (It’s probably worth noting that I don’t use red for VBUS & black for ground in my wiring photo below…I just used the wires that were already in the connector I used.) I also put kapton tape on the back of the D1 and covering part of the S6 to make sure there was no electrical contact between them. I attached the D1 to the S6 with some hot glue.
For SWS configuration, the only things I changed were DISPLAY_WEATHER and DISPLAY_INTERNAL_TEMPERATURE in Config.h. With the DISPLAY_WEATHER option set to ON, the BME280 weather values show on the SWS’s web page as shown in the screenshot below. In Extended.config.h I changed AP_SSID, and AP_PASSWORD to something other than the defaults.
Final Indoor Tests and Setup
With everything connected, I powered it up for the first time and did some quick bench testing in the shop. No smoke escaped and each axis moved. Simple test, but it was a great feeling to see the mount alive again. I did some slew rate tests in the shop too. I decided on 2 deg/sec as a target goto slew rate since this kept the motors safely below the stall speed.
I also let the GPS get a lock to verify it would update OnStep’s time and location. I turned the tracking on and verified it moved in the correct direction to track the stars.

After those tests were done, I hooked up my mini PC over USB and connected to the ASCOM Hub and NINA. I configured the NINA meridian flip settings following what others have done to work with OnStep and set PHD2’s “Reverse Dec output after meridian flip” to on in the Guiding Advanced Settings tab.
Bonus Side Quest! A Custom Bold MFG Telescope Pier
As part of this telescope mount revival, I decided to install a permanent pier in my back yard. I originally planned on installing a Todmorden-style pier which uses cinder blocks for the pier construction. Coupled with some cheap car disk brake rotors to act as a pier-to-mount adapter, others have had success with a pretty inexpensive project.
I had some family visiting for the holidays, including my step-dad and brother, so I asked them if they’d be interested in slapping together a pier with me. My brother full-on vetoed the idea of a cinder block pier. Not in a bad way though. My brother happens to own an amazing business that designs and manufactures beautiful metal products for your home, Bold MFG. He wasn’t about to let me install a pile of cinder blocks when he could build a gorgeous and bulletproof steel pier instead.
We started brainstorming. I quickly ditched the idea of cheap disk brake rotors as the pier-to-telescope adapter and settled on an iOptron Tri-pier adapter that fits the CGEM. I ordered the iOptron IOP-8036-TK adapter. That fits my CGEM and also works with several Orion, SkyWatcher, and Takahashi mounts. I figured the Tri-pier mounting holes would be nice to have in the pier because that would let me easily use this pier for any mount that iOptron sells a pier adapter for (including the Astro-Physics mount I have on my dream sheet). With that, I started a rough design for the pier. My design draft was just to relay my brainstorms and wish list to my brother to do the real design from later. Here’s my quickie draft:
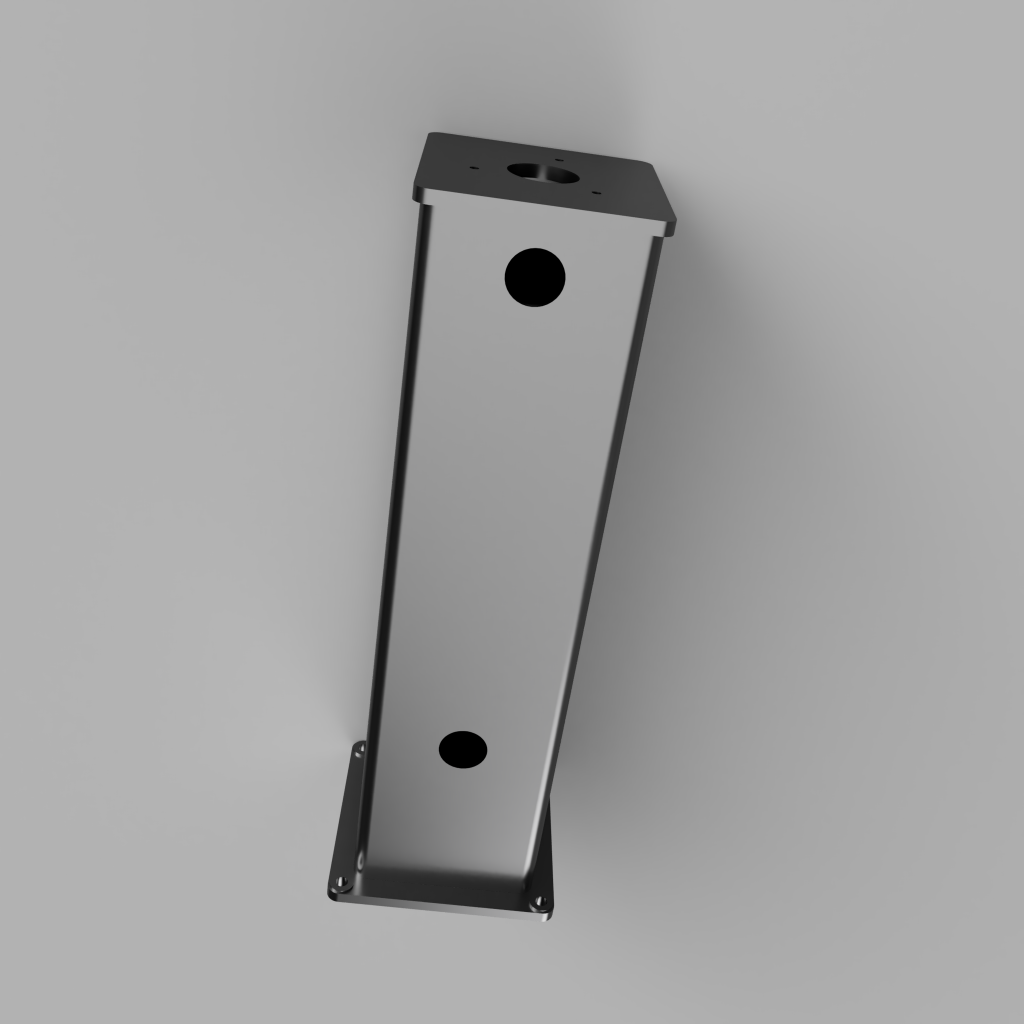
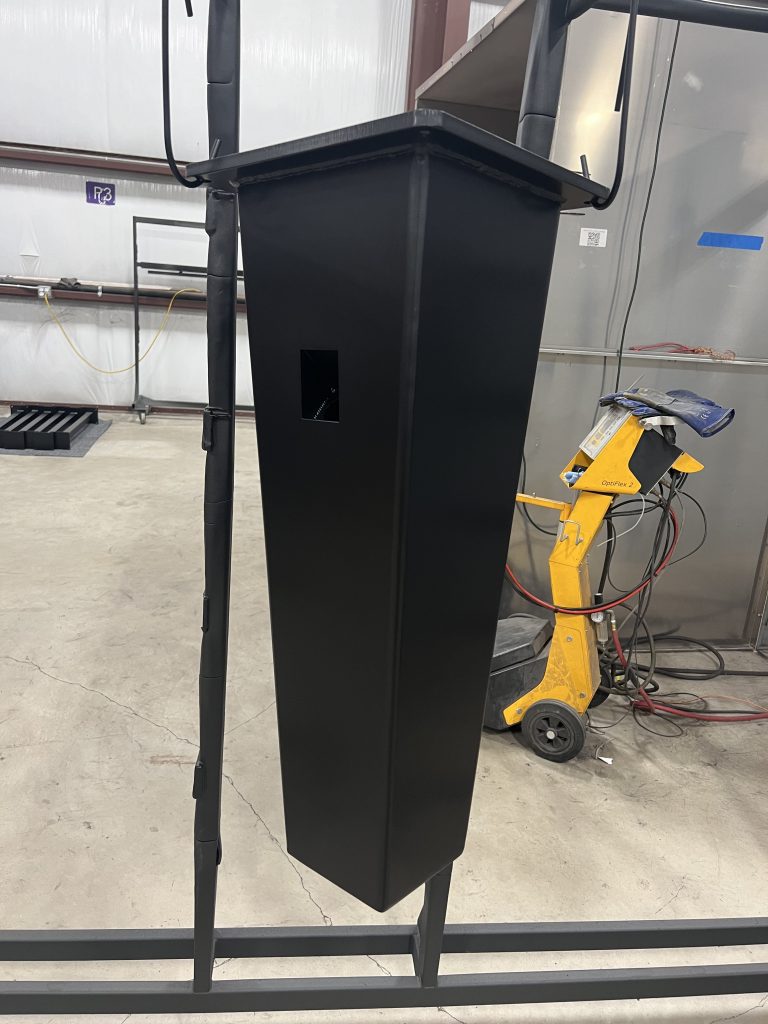
My brother knocked it out of the park. Here’s a shot of his design, fresh out of powder coating, hanging upside down. It’s CNC laser cut 1/2″ and 1/4″ steel, CNC bent and hand welded to perfection with an internal weather-shielded wire routing path. It’s tapered from the base to the top which gives it a great look and increases torsional strength. This pier is a beast!
My brother and his family drove to our house with the shiny new pier in the back of their SUV. Without any accessories, mounting hardware or adapters, the pier weighs just under 100lbs. That’s a lot of steel.
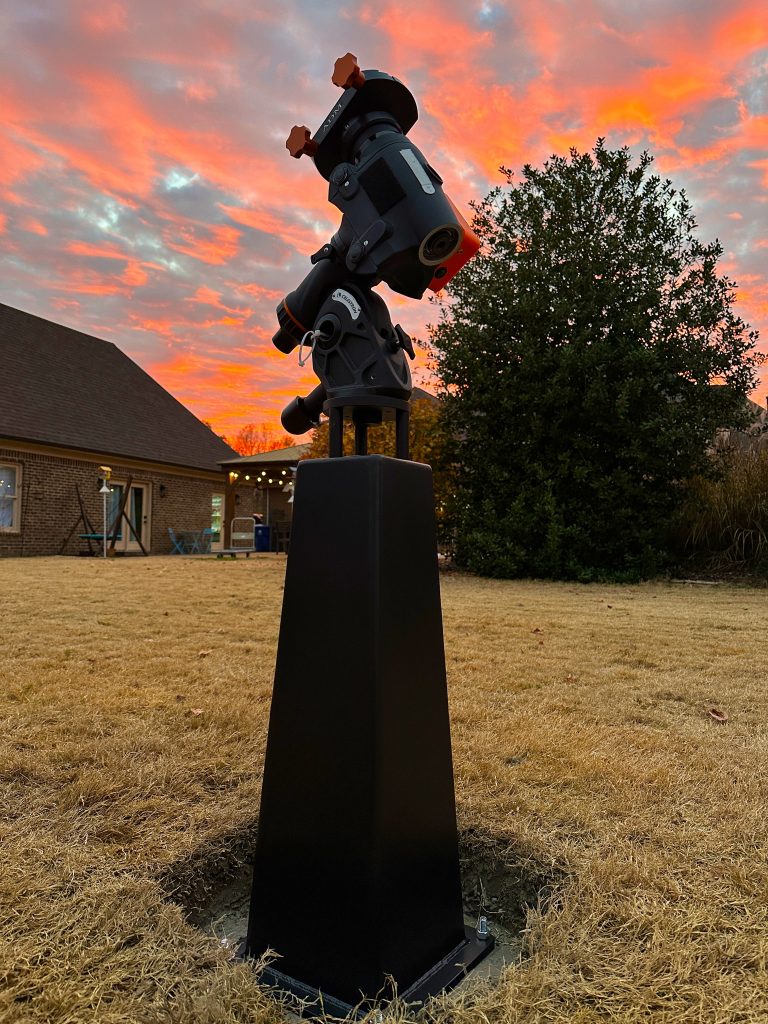
My stepdad, brother and I dug a hole about 30 inches deep with a flared bottom. We used about 350 lbs of Quikrete Fast Setting concrete mix to fill it and set 12″ long, 1/2″ diameter anchor bolts & some rebar into the concrete. We made the top of the concrete be about 4″ below grade so that we could remove the pier and make it “go away” if we needed to one day. The next day, we removed the anchor bolt alignment form (a piece of plywood with holes drilled in it). Once we felt like the concrete was set enough, we placed the pier and did a quick photo op with the CGEM mount. We joked that it was sturdy enough to mount a life-sized fighter jet on. The sunset showed up just in time. I love it! Bold MFG to the rescue.
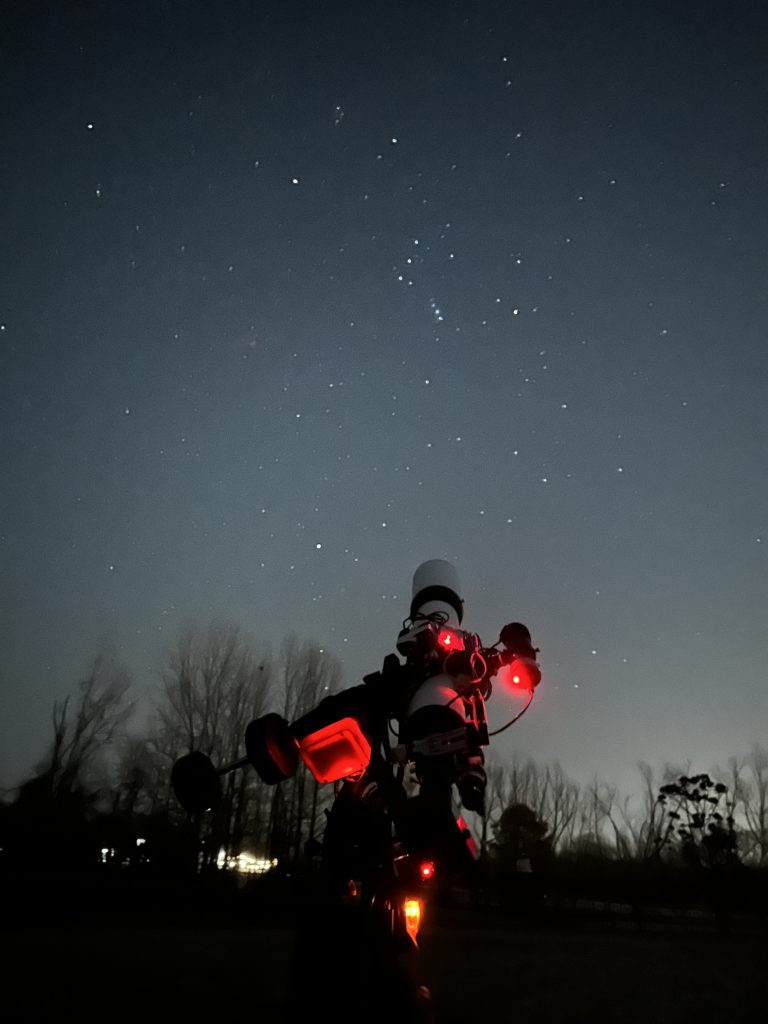
First Light
Winter weather pushed back first light for about a month. Everything worked nicely between OnStepX, NINA, ASCOM & PHD2. I did, however, uncover a problem with the Fysetc S6’s timers in OnStepX that caused my tracking rates to be off by several percent & all my autoguiding errors to be one-sided. I reported the issue and was amazed how fast Howard tracked it down and solved it. The latest version of OnStepX has this fixed. That’s a rock star open source developer!
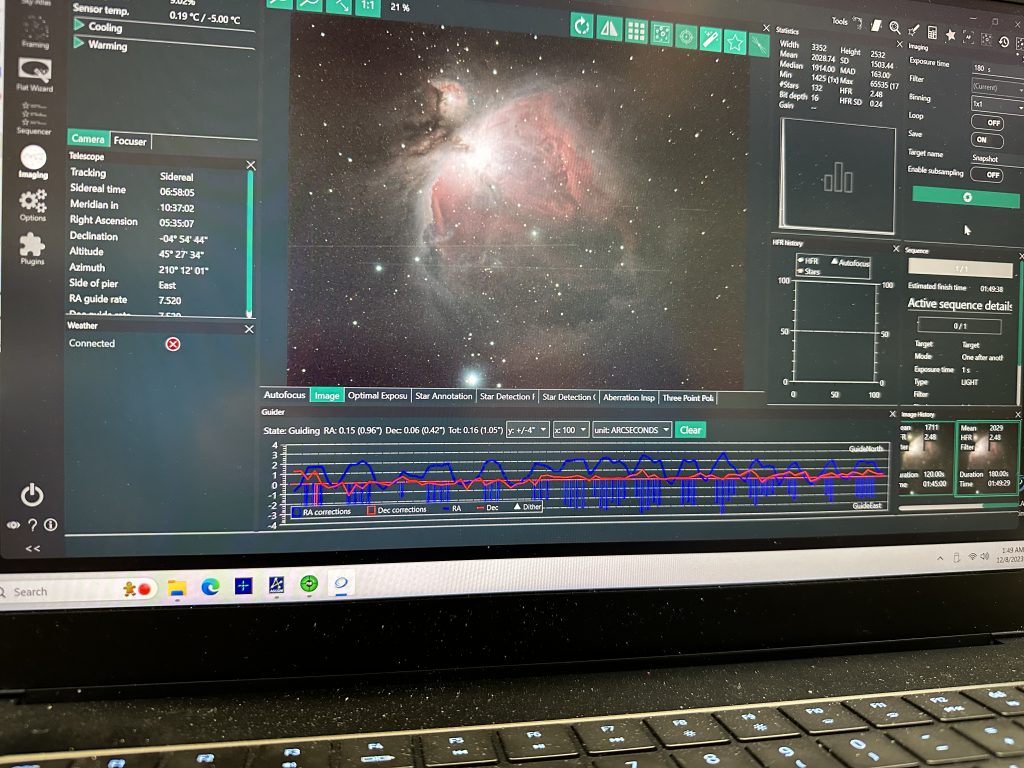
I did some more testing and tweaking over the next few weeks. With the new OnStepX fixes, autoguiding tracking was much better. I didn’t have the dew heaters or weather sensor working yet with OnStep, so it was time to tackle those.
Weather Sensor
At least one person reported getting a BME280 weather sensor working over an I2C connection with a Fysetc S6 and OnStep. I tried a GY-BME280-5V from AliExpress, but no matter what I did the weather values never showed up. I did verify my BME280 board worked by using a separate Arduino, but I gave up on getting it to work in OnStep.
I ordered a GY-BME280-3.3V from Amazon to try instead. I modified the 3d printed case to fit the bigger 3.3V version of the BME280 board and also modified the cover of my electronics case to have a place for the wires to pass. While I was at it, I also added holes for the telescope temp sensors to pass through. It took a little more learning to arrive at the config file I linked above, but the BME weather sensor is on and working.
Automatic Dew Heaters
With the weather sensor working, OnStep can now fully automate dew heater operation. With the OnStep Config.h settings for dew heaters I described above, they showed up in the SWS’s Auxiliary tab. I am still tweaking the settings, but I currently have SWS’s dew heater Zero set at -4C and Span set at 8C. Those settings have worked fine for the few nights I’ve imaged since. I made a quick spreadsheet to help determine OnStep dew heater settings. You can get that spreadsheet here.
It’s Time For Astrophotography!
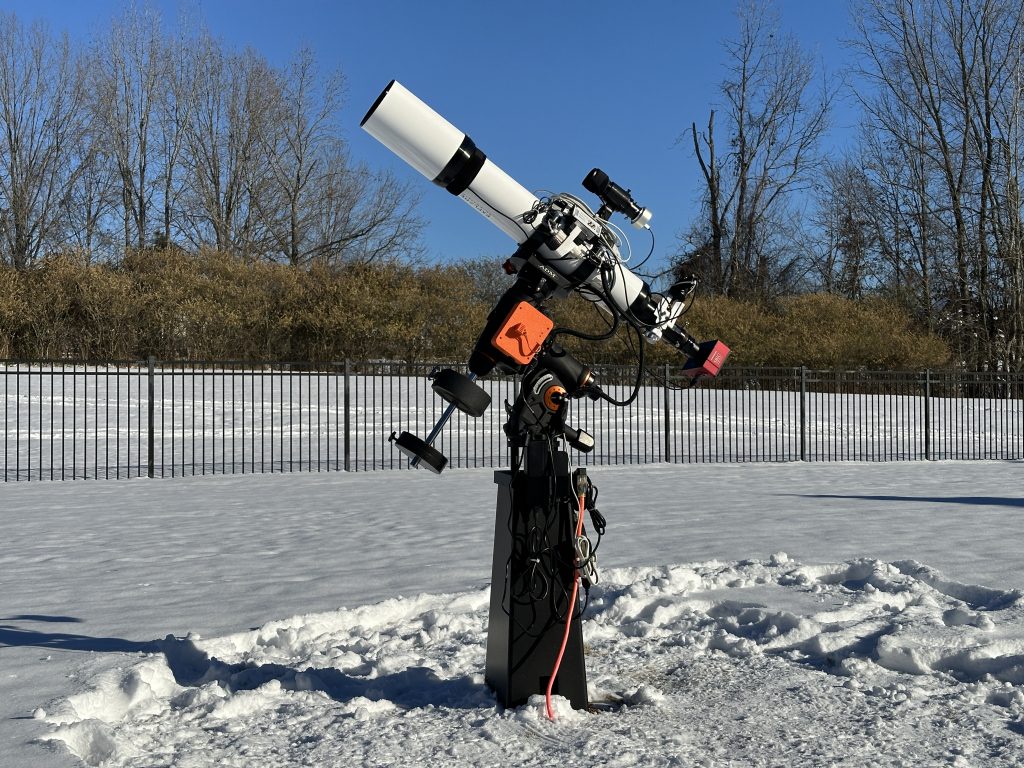
That’s the setup. Now I have a nicely tuned telescope mount with GPS, Wi-Fi, a built-in weather station, and automatic dew heater controllers that works very well with NINA and lets me easily remotely control my backyard observatory.
I still have a lot of wiring management to do, but everything’s working. My telescope has been set up in my back yard for over a month. With the new Bold MFG pier, mini PC and OnStepX upgrade for my CGEM, all I have to do is remove the Telegizmos 365 cover, turn on a few power switches and I’m ready to image. It’s really amazing how much of a game changer having a permanently-mounted telescope is.
Other Thoughts & Considerations
- Fysetc E4. This controller board has integrated TMC2209 stepper motor drivers and has gotten some semi-recent attention from the OnStep team. It doesn’t have quite the array of connection options that the S6 has, but there is a pre-compiled build of OnStepX for the Fysetc E4 which should make using it easier for some DIYers. The E4 is also smaller and should be easier to fit completely inside the CGEM.
- DS18B20 Temperature Probes (affiliate link). These can work with your BME280 weather sensor and dew heaters to further automate the dew heater control. I bought these, but haven’t installed them yet.
- Like I mentioned before, it may be worth considering using a power supply with more than 12V. It’s a long story about stepper motor controllers, but you should be able to get higher slew rates with a given setup if you use more voltage. That said, I’m running my CGEM with a max slew of 2deg/sec and it doesn’t bother me at all – especially since my entire setup is now automated and I can operate it from anywhere.
- Robofocus control. I have an old Robofocus electronic focus motor on my telescope. It works really well, so I haven’t seen the need to upgrade. That said, the control box is another thing that has to be mounted to my telescope. OnStep has the ability to control stepper motors for focusers and it should be possible to connect even my old Robofocus unidirectional stepper motor directly to my Fysetc S6 OnStep control board.
- More 3d printed CGEM + Fysetc S6 case tweaks. I’d like to move some of the holes around to get things to align better and give more clearance for wiring inside (especially for the Dupont wires I’m using on EXP2).
- Was it worth it? You’re right, I could have just picked up some overtime at work and used that money to buy a new mount. Would that have gotten me a better performing mount? Maybe. (Probably.) Would it have been as much fun as completely gutting a telescope mount and rebuilding it from the ground up? No way. Not even close.
My “CGEM OnStepX Upgrade: Complete” post on the OnStep group is here.
Whew! I wrote this for that one person who needed this info in one place. I hope this helps someone!
Disclaimer: I paid for all items above with my own money. Some links above are affiliate links. As an Amazon Associate I earn from qualifying purchases.

- bryan
- SBIG STF-8300C For Sale - SOLD! July 15, 2025
- The Rosette Nebula - NGC 2237, 2238, 2239 & 2244 March 18, 2025
- 116 Hour Horsehead and Flame Nebulae Mosaic February 6, 2025
- Fish Head Nebula - IC1795 January 12, 2025
- Science Lesson! Cygnus Wall in NGC7000 January 7, 2025
2 Comments
2 Pingbacks
-
M42 – The Orion Nebula After My OnStep & Pier Upgrade | Astronomy Nightly
-
Losmandy G11 Pier Adapter for iOptron Tri-Pier Mounting Holes | Astronomy Nightly
nice post
Thanks for checking it out!